Branding Your Event Photos: Watermarks & Logos
Pixeva Team
Branding Your Event Photos: Watermarks & Logos
Every photo your guests see is a chance to promote your studio.
Without branding, beautiful event images get saved and shared with no trace of who shot them. With consistent logo and text overlays, your gallery becomes a portfolio that works while you sleep.
Pixeva lets you configure branding once at the account level, preview it live, then turn it on or off per event—so corporate clients can stay logo-free while weddings carry your signature mark.
This guide covers why branding matters, how Pixeva watermarks work, setup steps, positioning tips, and common mistakes to avoid.
Note: Branding availability and plan details may vary. Confirm in your Settings → Branding and event dashboard before promising a specific workflow to clients.
Why brand event photos?
1) Credit and protection
Guests download and repost. A subtle watermark helps viewers know who created the image—useful for portfolio credit and discouraging uncredited use.
2) Professional delivery
Branded galleries feel like a finished product, not a random folder link. That supports premium pricing for photographers and agencies.
3) Marketing at scale
One wedding with 200 sharing guests can mean hundreds of social impressions. Your logo on each image is passive marketing.
4) Flexibility per client
Not every event should be watermarked (some corporate or press events require clean files). Pixeva’s per-event toggle lets you choose when branding applies.
Watermark vs branding (what we mean)
| Term | Meaning on Pixeva |
|---|---|
| Logo overlay | Your uploaded PNG/JPEG/WebP mark on photos |
| Text overlay | Custom text (studio name, URL, © line) |
| Branding mode | Logo only, text only, or both |
| Gallery branding | Overlay visible in the guest photo viewer |
| Header branding | Optional studio mark in the gallery header (separate toggle) |
Pixeva branding is designed for guest-facing galleries—consistent presentation without manually watermarking every file in Lightroom.
How Pixeva branding works
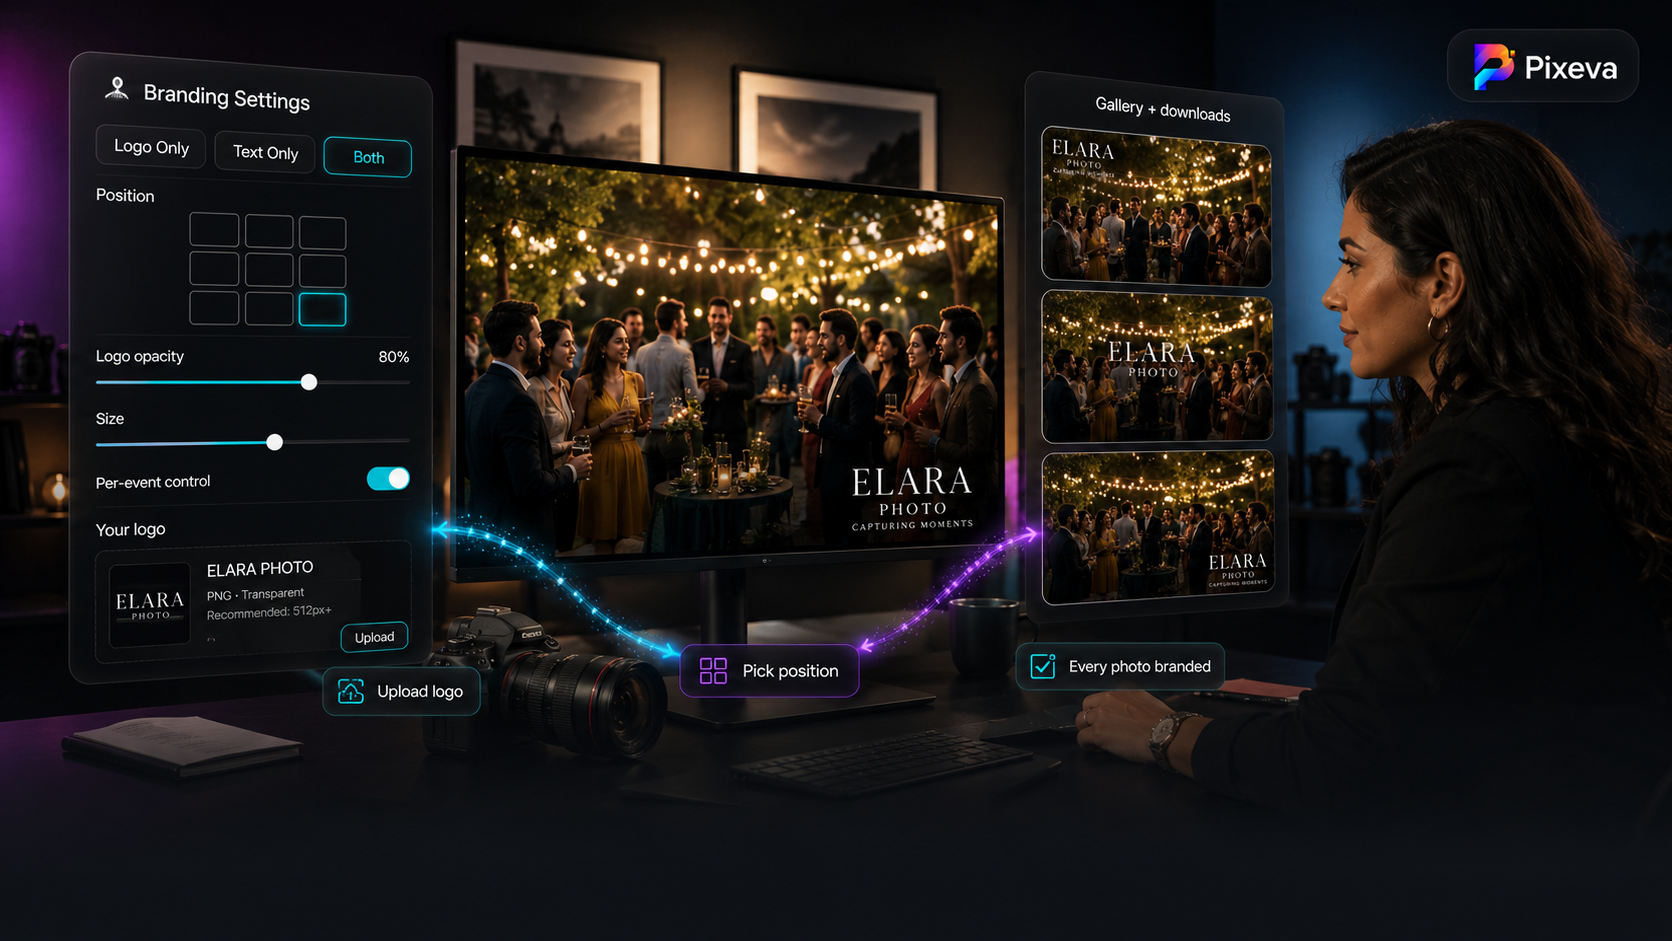
- Configure logo and/or text in account Branding Settings
- Preview on a sample photo (position, opacity, size)
- Enable branding for specific events in event settings
- Guests see overlays in the photo viewer when browsing and sharing
When you change settings, Pixeva can reprocess branding so existing photos reflect updates (depending on your workflow and queue).
Default starting point in the product:
- Position: bottom-right
- Opacity: ~80%
- Mode: logo + text (both), if you configure both
You can place logo and text independently (including custom drag positions on preview).
Setup guide (step by step)
Step 1: Open Branding Settings
Go to Dashboard → Settings → Branding (or your account branding page).
Step 2: Upload your logo
- Formats: PNG, JPEG, WebP
- Max size: 2MB
- Use a transparent PNG for best results on varied photo backgrounds
Tip: Simple horizontal logos read better than busy full-lockups at small sizes.
Step 3: Add text (optional)
Examples:
© Studio Name 2026studio-name.comPhotography by [Name]
Keep text short—long URLs wrap awkwardly on mobile.
Step 4: Choose mode
| Mode | Use when |
|---|---|
| Logo only | Strong icon mark; minimal look |
| Text only | No logo file yet; quick © line |
| Both | Maximum brand recognition |
Step 5: Set position
Use the 3×3 grid:
- Top-left / top-center / top-right
- Center
- Bottom-left / bottom-center / bottom-right (common default)
Custom: drag logo and text on the live preview for pixel-perfect placement.
Step 6: Adjust opacity and size
- Opacity — 70–85% is usually visible but not aggressive
- Size — scale logo so it survives phone screens without covering faces
Preview on both bright and dark sample images before going live.
Step 7: Save and enable per event
Branding is off by default for each event until you enable it:
- Open the event dashboard
- Find Branding in event settings
- Toggle Enable branding for this event
- Optionally toggle Show branding in gallery header
You must have logo or text configured in account settings before the event toggle is useful.
Positioning best practices
Do not cover faces
Default bottom-right or bottom-center usually avoids subjects. For group formals, test on a busy sample.
Consistency beats creativity
Pick one position style for your studio and reuse it. Clients recognize your look.
Separate logo and text when needed
Stack logo above URL text in both mode, or use custom positions so text sits below the mark.
Test on mobile
Most guests view on phones. Open your gallery on a small screen after enabling.
Match event tone
- Weddings: lighter opacity, elegant text
- Corporate: logo only, bottom-right, conservative size
- Festivals: slightly bolder mark if brand guidelines allow
Opacity and sizing cheat sheet
| Look | Opacity | Size |
|---|---|---|
| Subtle signature | 60–70% | Small |
| Standard studio mark | 75–85% | Medium (default range) |
| Strong protection | 85–95% | Medium–large |
Avoid 100% opaque blocks unless contractually required—they distract from the moment.
Per-event control (why it matters)
Account settings = your brand kit
Event toggle = whether this gallery uses it
Examples:
- Client A (wedding): branding on
- Client B (internal corporate): branding off
- Portfolio test event: header branding on, photo overlay off
This split saves you from maintaining two Pixeva accounts.
Use cases
Wedding & event photographers
Deliver a guest gallery that still says your name when cousins post to Instagram.
Creative agencies
Run activations with agency or co-brand logo on every shared photo.
Video & hybrid teams
Pair branding with your gallery workflow so photo deliverables match other branded assets.
Corporate events
Turn off photo watermarks if the client owns clean assets; keep header branding only for gallery navigation credit.
Branding vs manual watermarking in Lightroom
| Manual export | Pixeva branding | |
|---|---|---|
| Setup | Per batch / export preset | Once + per-event toggle |
| Guest gallery | Must bake in before upload | Applied in viewer workflow |
| Changes | Re-export files | Update settings + reprocess |
| Best for | Print masters, client RAW delivery | Live guest gallery + sharing |
Many studios use both: clean masters for the client, branded guest gallery for public sharing.
Troubleshooting
Branding toggle disabled or empty
Upload a logo or enter text in account Branding Settings first.
Logo looks blurry
Upload higher-resolution PNG; avoid upscaling a tiny file.
Logo invisible on white dresses / bright sky
Add a thin dark outline in your logo file, or increase opacity slightly.
Wrong position on some aspect ratios
Test portrait and landscape samples; use custom position if one grid slot fails on vertical phone crops.
Changed logo but old mark still shows
Save settings and run reprocess branding if available; clear cache and recheck gallery.
Client wants zero watermark
Disable event branding for that event—no need to delete your account logo.
Legal and client expectations
- Put watermark terms in your contract (guest gallery vs print rights).
- Branding on gallery photos does not replace copyright—it helps attribution.
- Some clients purchase unbranded deliverables; respect that and use per-event off.
How branding fits your Pixeva stack
Strong delivery pipeline:
- Upload / sync photos
- Guests find themselves (face search)
- Branded viewer builds trust
- Caption Magic (optional) helps them share
- Analytics show what resonated
Branding is the signature layer on top of discovery and sharing.
Conclusion
Your event photos already have emotional value. Branding adds business value—credit, consistency, and quiet marketing on every view and share.
Upload your logo once, dial in position and opacity, enable branding on the events that fit, and deliver galleries that look as professional as the work inside them.
Add your branding on Pixeva: (https://pixeva.co)
Keep exploring with Pixeva
Want to put this into practice? These pages go deeper: